


231 | CertificateRevocation DellPowerConnectW-SeriesArubaOS6.2 | User Guide
In the WebUI
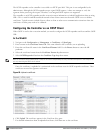
1. Navigate to the Configuration > Management > Certificates > Upload page.
2. Enter a name in the Certificate Name field. This name identifies the CRL certificate you are uploading.
3. Enter the certificate file name in the Certificate Filename field. Use the Browse button to enter the full
pathname.
4. Select the certificate format from the Certificate Format drop-down menu.
5. Select CRL from the Certificate Type drop-down menu.
NOTE: A revocation check method (OCSP or CRL) can be chosen independently for every revocation checkpoint. In this example, we
are only describing the CRL check method.
Once this CRL is uploaded it is maintained in the store for CRLs. These CRLs are used for signature
verification.
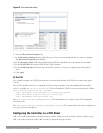
6. Click Upload. The CRL appears in the Certificate Lists pane. Select CRL from the Group drop-down list if you
want to display only CRLs.
7. For detailed information about an uploaded CRL, click View next to the CRL.
8. Select the Revocation Checkpoint tab.
9. In the Revocation Checkpoint pane, click Edit next to the revocation checkpoint that you want to configure.
The Revocation Checkpoint pane displays.
10. In the Revocation Check field, select crl from the Method 1 drop-down list.
11. In the CRL Location field, enter the CRL you want used for this revocation checkpoint. The CRLs listed are
files that have already been imported onto the controller.
12. Click Apply.
In the CLI
This example configures an OCSP responder with the check method as CRL for revocation check point ROOTCa-
ssh-webui. The CRL location is crl1 and the revocation check method is crl.
(host) (config) #crypto-local pki rcp ROOTCa-ssh-webui
(host) (RCP-CARoot) #crl-location file crl1
(host) (RCP-CARoot) #revocation-check crl
Configuring the Controller as an OCSP Responder
When configured as an OCSP responder, the controller provides revocation status information to ArubaOS
applications that are using CRLs.
In the WebUI
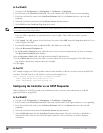
1. Navigate to the Configuration > Management > Certificates > Upload page.
2. Enter a name in the Certificate Name field. This name identifies the OCSP signer certificate you are uploading.
3. Enter the certificate file name in the Certificate Filename field. Use the Browse button to enter the full
pathname.
4. Select the certificate format from the Certificate Format drop-down menu.
5. Select OCSP signer cert from the Certificate Type drop-down menu. Once this certificate is uploaded it is
maintained in the certificate store for OCSP signer certificates. These certificates are used for signature
verification.