


123 | NetworkConfigurationParameters DellPowerConnectW-SeriesArubaOS6.2 | User Guide
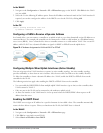
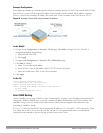
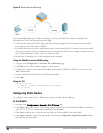
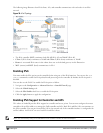
Figure 35: Default Inter-VLAN Routing
You can optionally disable layer-3 traffic forwarding to or from a specified VLAN. When you disable layer-3
forwarding on a VLAN, the following restrictions apply:
l Clients on the restricted VLAN can ping each other, but cannot ping the VLAN interface on the controller.
Forwarding of inter-VLAN traffic is blocked.
l IP mobility does not work when a mobile client roams to the restricted VLAN. You must ensure that a mobile
client on a restricted VLAN is not allowed to roam to a non-restricted VLAN. For example, a mobile client on a
guest VLAN should not be able to roam to a corporate VLAN.
To disable layer-3 forwarding for a VLAN configured on the controller:
Using the WebUI to restrict VLAN routing
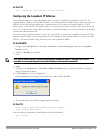
1. Navigate to the Configuration > Network > IP > IP Interface page.
2. Click Edit for the VLAN for which routing is to be restricted.
3. Configure the VLAN to either obtain an IP address dynamically (via DHCP or PPPoE) or to use a static IP
address and netmask.
4. Deselect (uncheck) the Enable Inter-VLAN Routing checkbox.
5. Click Apply.
Using the CLI
interface vlan <id>
ip address {<ipaddr> <netmask>|dhcp-client|pppoe}
no ip routing
Configuring Static Routes
To configure a static route (such as a default route) on the controller, do the following:
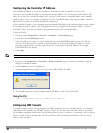
In the WebUI
1. Navigate to the Configuration > Network > IP > IP Routes page.
2. Click Add to add a static route to a destination network or host. Enter the destination IP address and network
mask (255.255.255.255 for a host route) and the next hop IP address.
3. Click Done to add the entry. Note that the route has not yet been added to the routing table.
4. Click Apply to add this route to the routing table. The message Configuration Updated Successfullyconfirms
that the route has been added.