


822 | RF Plan DellPowerConnectW-SeriesArubaOS6.2 | User Guide
value in the text box at the left of the drop-down and press the enter key on your keyboard. For example, enter a zoom factor of
400.
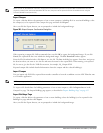
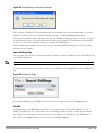
1. In the Planning page, click theNew link in the Areas section under Floor 1 (named Entrance Level).
This opens the Area Editor.
2. Enter: Shipping and Receiving in the Name text box in the Area Editor.
3. Select Don’t Care from the Type drop-down menu box.
4. Click Apply.
Notice that an orange box appears near the center of the floor plan.
5. Use your mouse (or other pointing device) to place the cursor over the box.
Notice that the information you typed in the editor appears in the box. You see the name and type of area, as
well as the coordinates of the lower left corner and upper right corner of the box.
NOTE: The x = 0 and y = 0 coordinates correspond to the lower left corner of the layout space.
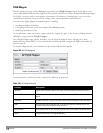
6. Using your mouse, left-click and drag the box to the area of your floor plan that will represent the shipping and
receiving area.
7. To position the Don’t Care box, drag one corner of the box to a corresponding corner and using one of the corner
handles of the box, stretch it to fit.
You can also position the box by entering values in the Left, Bottom, Right, and Top fields.
8. Click Save, then OK.
Creating a Don’t Deploy Area
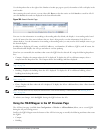
1. Click the New link in the Areas section under Floor 1 (named Entrance Level) to open the Area Editor.
2. Enter: Lobby in the Name text box in the Area Editor.
3. Select Don’t Deploy from the Type drop-down menu box.
4. Click Apply.
Notice that an yellow box appears near the center of the floor plan.
5. Use your mouse (or other pointing device) to place the cursor over the box.
Notice that the information you typed in the editor appears in the box. You see the name and type of area, as
well as the coordinates of the lower left corner and upper right corner of the box.
NOTE: The x = 0 and y = 0 coordinates correspond to the lower left corner of the layout space.
6. Using your mouse, left-click and drag the box to the area of your floor plan that you wish to designate are the
Lobby Area.
7. To position the Don’t Deploy box, drag one corner of the box to a corresponding corner and using one of the
corner handles of the box, stretch it to fit.
8. You can also position the box by entering values in the Left, Bottom, Right, and Top fields.
9. Click Save, then OK.
Running the AP Plan
In this section you run the algorithm that searches for the best place to put the APs.