


l If you selected AP Group, click the Edit button by the AP group name to which you want to assign a new
mesh cluster profile.
l If you selected AP Specific, click the Edit button by the AP to which you want to assign a new mesh cluster
profile
2. Under the Profiles list, expand the Meshmenu, then select Mesh Cluster profile.
3. In the Profile Details window pane, click the Mesh Cluster profile drop-down list select New.
l To add an existing mesh-cluster profile to the selected AP group, click the Add a profile drop-down list and
select a new profile name from the list.
4. Click the using priority drop-down list to select a priority for the mesh cluster profile. The lower the number, the
higher the priority.
NOTE: If you configure multiple cluster profiles with different cluster priorities, you manually override the link metric algorithm
because the priority takes precedence over the path cost. In this scenario, the mesh portal uses the profile with the highest priority
to bring-up the mesh network.
5. Click Add to add the mesh cluster profile to the AP group.
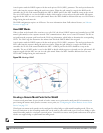
Configuring a DHCP Pool
In this next step, you must configure a DHCP pool where the DHCP server is on the subnet associated with mesh
private VLAN. Mesh points get their IP address from this subnet pool. To complete this task, refer to the procedure
described in “Configuring the DHCP Server on the Remote AP”.
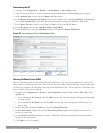
Configuring the VLAN ID of the Virtual AP Profile
The VLAN of this Virtual AP must have the same VLAN ID as the mesh private VLAN.
1. Navigate to Configuration > Wireless > AP Configuration window. Select either the AP Group or AP Specific
tab. Click the Edit button by the applicable AP group name or AP name with the virtual AP profile you want to
configure.
2. Under Profiles, select Wireless LAN, then Virtual AP.
3. To create a new virtual AP profile in the WebUI, select New from the Add a profile drop-down menu. Enter the
name for the virtual AP profile, and click Add.
NOTE: Whenever you create a new virtual AP profile in the WebUI, the profile automatically contains the “default” SSID profile with
the default “Dell-ap” ESSID. You must configure a new ESSID and SSID profile for the virtual AP profile before you apply the profile.
a. In the Profile Details window, click the AAA Profile drop-down list and select the previously configured AAA
profile. The AAA Profile pop-up window appears.
b. To set the AAA profile and close the window, click Apply.
c. In the Profile Details entry for the new virtual AP profile, select NEW from the SSID Profile drop-down
menu. A pop-up window displays to allow you to configure the SSID profile.
d. Enter the name for the SSID profile.
e. Under Network, enter a name in the Network Name (SSID) field.
f. Under Security, select the network authentication and encryption methods.
g. To set the SSID profile and close the window, click Apply.
4. Click Apply at the bottom of the Profile Details window.
5. Click the new virtual AP name in the Profiles list or Profile Details window pane to display the configuration
parameters for this profile.
6. In the Profile Details window:
DellPowerConnectW-SeriesArubaOS6.2 | User Guide SecureEnterpriseMesh | 475