


145 | IPv6 Support DellPowerConnectW-SeriesArubaOS6.2 | User Guide
The following example creates a policy ‘ipv6-web-only’ that allows only web (HTTP and HTTPS) access for IPv6
clients and assigns the policy to the user role “web-guest”.
NOTE: The user role “web-guest” can include both IPv6 and IPv4 policies, although this example only shows configuration of an IPv6
policy.
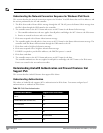
Creating an IPv6 Firewall Policy
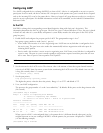
Following the procedure below to create an IPv6 firewall policy via the WebUI.
1. Navigate to the Configuration > Security > Access Control > Policies page.
2. Click Add to create a new policy.
3. Enter ipv6-web-only for the Policy Name.
4. To configure a firewall policy, select Session for Policy Type.
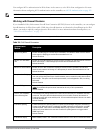
5. Click Add to add a rule that allows HTTP traffic.
a. Under IP Version column, select IPv6.
b. Under Source, select network from the drop-down list.
c. For Host IP, enter 2002:d81f:f9f0:1000::.
d. For Mask, enter 64as the prefix-length.
e. Under Service, select service from the drop-down list.
f. Select svc-http from the scrolling list.
g. Click Add.
6. Click Add to add a rule that allows HTTPS traffic.
a. Under IP Version column, select IPv6.
b. Under Source, select network from the drop-down list.
c. For Host IP, enter 2002:d81f:f9f0:1000::.
d. For Mask, enter 64 as the prefix-length.
e. Under Service, select service from the drop-down list.
f. Select svc-https from the scrolling list.
g. Click Add.
.
NOTE: Rules can be reordered using the up and down arrow buttons provided for each rule.
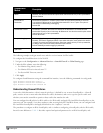
7. Click Apply to apply the configuration. The policy is not created until the configuration is applied.
To create an IPv6 firewall policy using the command-line interface, issue the following commands in config mode:
ip access-list session ipv6-web-only
ipv6 network 2002:d81f:f9f0:1000::/64 any svc-http permit
ipv6 network 2002:d81f:f9f0:1000::/64 any svc-https permit
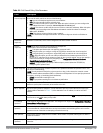
Assigning an IPv6 Policy to a User Role
To assign an IPv6 policy using the WebUI:
1. Navigate to the Configuration > Security > Access Control > User Roles page.
2. Click Add to create a new user role.
3. Enter web-guest for Role Name.