


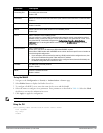
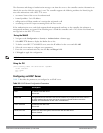
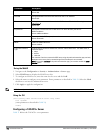


Parameters Description
Password (Required) Enter a password or select Generate to automatically generate a password string. An
entered password must be a minimum of 6 characters and can be up to 128 characters in length.
Role Role for the client.
In order for this role to be assigned to a client, you need to configure a server derivation rule, as
described in "Configuring Server-Derivation Rules" on page 182. (A user role assigned through a
server-derivation rule takes precedence over the default role configured for an authentication
method.)
E-mail (Optional) E-mail address of the client.
Enabled Select this checkbox to enable the user as soon as the user entry is created.
Expiration Select one of the following options:
l Entry does not expire: No expiration on user entry
l Set Expiry time (mins): Enter the number of minutes the user is authenticated before their user
entry expires.
l Set Expiry Date (mm/dd/yyyy) Expiry Time (hh:mm): To select a specific expiration date and
time, enter the expiration date in mm/dd/yyyy format, and the expiration time in hh:mm format.
Static Inner IP Address
(for RAPs only)
Assign a static inner IP address to a Remote AP. If this database entry is not for a remote AP, leave
this field empty.
Using the WebUI
1. Navigate to the Configuration > Security > Authentication > Servers page.
2. Select Internal DB.
3. Click Add User in the Users section. The user configuration page displays.
4. Enter the information for the client, as described in the table above.
5. Click Enabled to activate this entry on creation.
6. Click Apply to apply the configuration. The configuration does not take effect until you perform this step
7. At the Servers page, click Apply.
NOTE: The Internal DB Maintenance window also includes a Guest User Page feature that allows you to create user entries for
guests only. For details on creating guest users, see "Guest Provisioning User Tasks" on page 651.
Using the CLI
Enter the following command in enable mode:
(host)(config) #local-userdb add {generate-username|username <name>}{
generate-password|password <password>}
Managing Internal Database Files
ArubaOS allows you to import and export tables of user information to and from the internal database. These files
should not be edited once they are exported. ArubaOS only supports the importing of database files that were
created during the export process. Note that importing a file into the internal database overwrite and removes all
existing entries.
Exporting Files in the WebUI
1. Navigate to the Configuration > Security > Authentication > Servers page.
2. Select Internal DB.
DellPowerConnectW-SeriesArubaOS6.2 | User Guide Authentication Servers | 176