


In the WebUI
To configure the Stateful 802.1x Authentication profile via the WebUI:
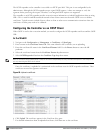
1. Navigate to the Configuration > Security > Authentication > L2 Authentication window.
2. In the Profiles list, select Stateful 802.1x Authentication Profile.
3. Click the Default Role drop-down list, and select the role assigned to stateful 802.1x authenticated users.
4. Specify the timeout period for authentication requests, from 1-20 seconds. The default value is 10 seconds.
5. Select the Mode checkbox to enable stateful 802.1x authentication.
In the CLI
Use the following commands to configure stateful 802.1x authentication via the command-line interface. The first
set of commands defines the RADIUS server used for 802.1x authentication, and the second set assigns that server
to a server group. The third set of commands associates that server group with the stateful 802.1x authentication
profile, then sets the authentication role and timeout period.
(host)(config)# aaa authentication-server radius <server-name>
acctport <port>
authport <port>
clone <server>
enable
host <ipaddr>
key <psk>
nas-identifier <string>
nas-ip <ipaddr>
retransmit <number>
timeout <seconds>
use-md5
!
(host)(config)# aaa server-group group <server-group>
auth-server <server-name>
!
(host)(config)# aaa authentication stateful-dot1x
server-group <server-group>
default-role <role>
enable
timeout <seconds>
Configuring Stateful NTLM Authentication
The Stateful NTLM Authentication profile requires that you specify a server group which includes the servers
performing NTLM authentication, and the role to be assigned to users who are successfully authenticated. For
details on defining a windows server used for NTLM authentication, see "Configuring a Windows Server" on page
174.
When the user logs off or shuts down the client machine, the user remains in the authenticated role until the user
ages out, that is, until the user has sent no traffic for the amount of time specified in the User Idle Timeout setting
in the Configuration > Security > Authentication > Advanced page.
In the WebUI
To create and configure a new instance of a stateful NTLM authentication profile via the WebUI:
1. Navigate to the Configuration > Security > Authentication > L3 Authenticationpage.
DellPowerConnectW-SeriesArubaOS6.2 | User Guide | 223