


513 | Remote AccessPoints DellPowerConnectW-SeriesArubaOS6.2 | User Guide
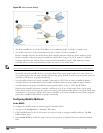
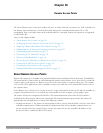
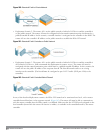
NAT device, you must enable NAT-T (UDP port 4500 only) and forward all packets to the public address of the
NAT device on UDP port 4500 to the controller to ensure that the remote AP boots successfully.
Configure the VPN Server
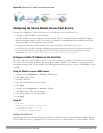
This section describes how to configure the IPSec VPN server on the controller. For more details, see Virtual Private
Networks on page 271. The remote AP will be a VPN client that connects to the VPN server on the controller.
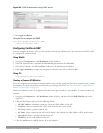
Using the WebUI
1. Navigate to the Configuration > Advanced Services > VPN Services > IPSec page.
2. Select (check) Enable L2TP.
3. Make sure that PAP (Password Authentication Protocol) is selected for Authentication Protocols.
4. To configure the L2TP IP pool, click Add in the Address Pools section. Configure the L2TP pool from which
the APs will be assigned addresses, then click Done.
NOTE: The size of the pool should correspond to the maximum number of APs that the controller is licensed to manage.
5. To configure an Internet Security Association and Key Management Protocol (ISAKMP) encrypted subnet and
preshared key, click Add in the IKE Shared Secrets section and configure the preshared key. Click Done to return
to the IPSec page.
6. Click Apply.
Using CLI
vpdn group l2tp
ppp authentication PAP
ip local pool <pool> <start-ipaddr> <end-ipaddr>
crypto isakmp key <key> address <ipaddr> netmask <mask>
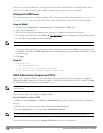
CHAP Authentication Support over PPPoE
RAPs can now establish a PPPoE session with a PPPoE server at the ISP side and get authenticated using the
Challenge Handshake Authentication Protocol (CHAP). The PPPoE client running on a RAP is capable of handling
the CHAP authentication requests from the PPPoE server.
NOTE: The PPPoE client selects either the PAP or the CHAP credentials for the RAP authentication depending upon the request from
the PPPoE server.
You can use the CLI or the WebUI to configure CHAP.
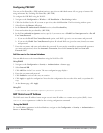
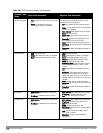
Using the WebUI to configure CHAP
1. Navigate to the Configuration > Wireless > AP Installation page. The list of discovered APs are displayed on
this page.
2. Select the AP you want to configure using CHAP and click Provision button.
3. Enter the CHAP Secret in the text box under Authentication Method.
NOTE: You can use all the special characters except question mark (?) and the space can be used within double quotes (“ “).
4. Enter the CHAP Secret again in the Confirm CHAP Secret text box for confirmation.