


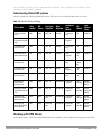
Devices running Windows 2008 server can use Suite-B cryptographic algorithms and IKEv1 to support
authentication using RSA or ECDSA. Strongswan 4.3 devices can use IKEv2 to support authentication using RSA
or ECDSA certificates, Suite-B cryptographic algorithms, and pre-shared keys.
Working with Site-to-Site VPNs with Dynamic IP Addresses
ArubaOS supports site-to-site VPNs with two statically addressed Dell controllers, or with one static and one
dynamically addressed controller. By default, site-to-site VPN uses IKE Main-mode with Pre-Shared-Keys to
authenticate the IKE SA. This method uses the IP address of the peer, and therefore does not work for dynamically
addressed peers.
To support site-site VPN with dynamically addressed devices, you must enable IKE Aggressive-Mode with
Authentication based on a Pre-Shared-Key. The Dell controller with a dynamic IP address must be configured to be
the
initiator
of IKE Aggressive-mode for Site-Site VPN, while the controller with a static IP address must be
configured as the
responder
of IKE Aggressive-mode.
Understanding VPN Topologies
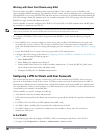
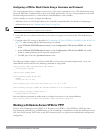
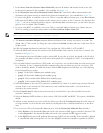
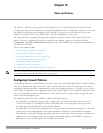
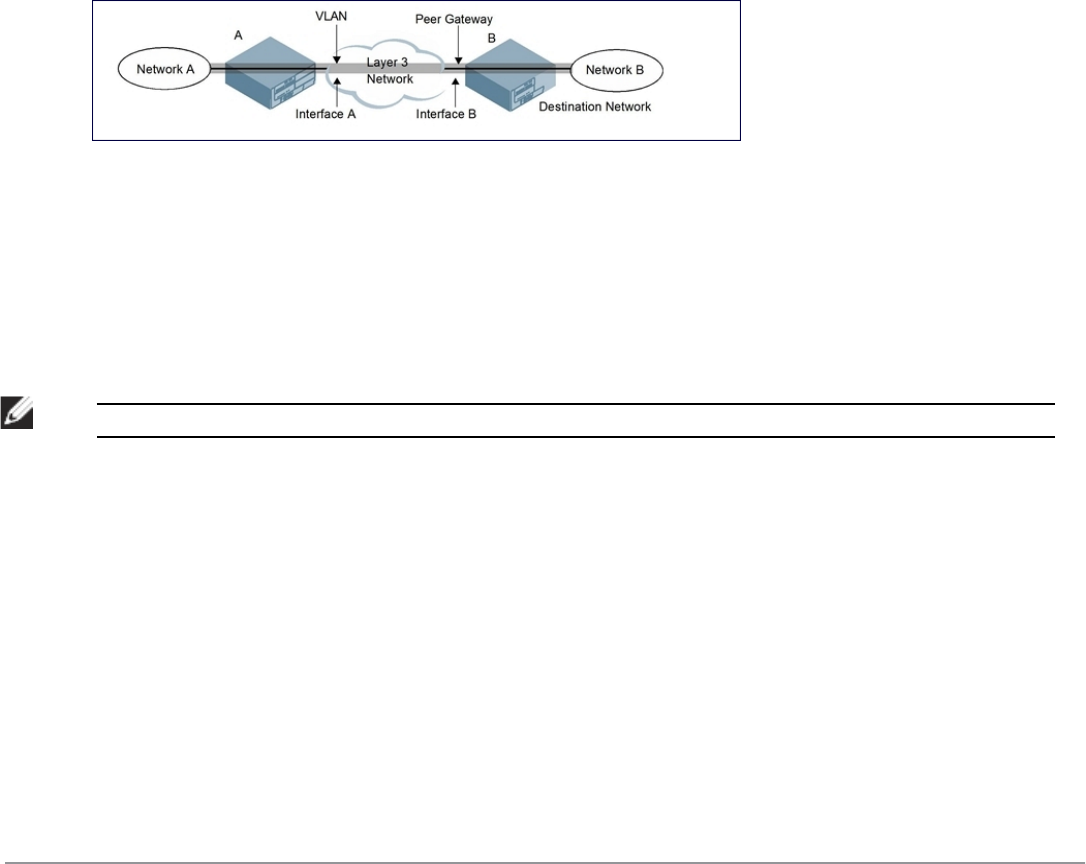
You must configure VPN settings on the Dell controllers at both the local and remote sites. In the following figure, a
VPN tunnel connects Network A to Network B across the Internet.
Figure 78: Site-to-Site VPN Configuration Components
To configure the VPN tunnel on controller A, you need to configure the following:
l The source network (Network A)
l The destination network (Network B)
l The VLAN on which the controller A’s interface to the Layer-3 network is located (Interface A in the Figure 78)
l The peer gateway, which is the IP address of controller B’s interface to the Layer-3 network (Interface B in the
Figure 78)
NOTE: Configure VPN settings on the Dell controllers at both the local and remote sites.
Configuring Site-to-Site VPNs
Use the following procedures to create a site-to-site VPN via the WebUI or command-line interfaces.
In the WebUI
1. Navigate to the Configuration > Advanced Services > VPN Services > Site-to-Site page.
2. In the IPsec Maps section, click Add to open the Add IPsec Map window.
3. Enter a name for this VPN connection in the Name field.
4. Enter a priority level for the IPsec map. Negotiation requests for security associations try to match the highest-
priority map first. If that map does not match, the negotiation request continues down the list to the next-
highest priority map until a match is made.
DellPowerConnectW-SeriesArubaOS6.2 | User Guide VirtualPrivateNetworks | 289