


When the controller detects an error situation, it will pass the user's page a variable called "errmsg" with a
value of what the error is in English. Currently, only "Authentication Failed" is supported as a valid error
message.
To localize the authentication failure message, replace the following text (it is just a few lines below the
<body> tag):
<div id="errorbox" style="display: none;">
</div>
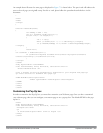
with the script below. You will need to translate the "Authentication Failed" error message into your local
language and add it into the script below where it states: localized_msg="...":
<script>
{
var q = window.location.search;
var errmsg = null;
if (q && q.length > 1) {
q = q.substring(1).split(/[=&]/);
for (var i = 0; i < q.length - 1; i += 2) {
if (q[i] == "errmsg") {
errmsg = unescape(q[i + 1]);
break;
}
}
}
if (errmsg && errmsg.length > 0) {
switch(errmsg) {
case "Authentication Failed":
localized_msg="Authentication Failed";
break;
default:
localised_msg=errmsg;
break;
}
errmsg = "<div id='errorbox'>\n" + localised_msg + "\n</div>\n";
document.write(errmsg);
};
}
</script>
e. Translate the web page text. Once you have made the changes as above, you only need to translate the rest of
the text that appears on the page. The exact text that appears will depend on the controller settings when you
originally viewed the captive portal. You will need to translate all relevant text such as "REGISTERED
USER", "USERNAME", "PASSWORD", the value="" part of the INPUT type="submit" button and all other
text. Ensure that the character set you use to translate into is the same as you have selected in part i) above.
Feel free to edit the HTML as you go if you are familiar with HTML.
5. After saving the changes made in step 4 above, upload the file to the controller using the
Configuration > Management >Captive Portal > Upload Custom Login Pages section of the WebUI.
Choose the captive portal profile from the drop-down menu. Browse your local computer for the file you saved.
For Page Type, select “Captive Portal Login”. Ensure that the "Revert to factory default settings" box is NOT
checked and click Apply. This will upload the file to the controller and set the captive portal profile to use this
page as the redirection page.
In order to check that your site is operating correctly, go back to the "Customize Login Page" and click on "View
Captive Portal" to view the page you have uploaded. Check that your browser has automatically detected the
character set and that your text is not garbled.
DellPowerConnectW-SeriesArubaOS6.2 | User Guide CaptivePortalAuthentication | 261