


238 | CaptivePortalAuthentication DellPowerConnectW-SeriesArubaOS6.2 | User Guide
The following sections present the WebUI and Command Line (CLI) procedures for configuring the captive portal
authentication profile, initial user role, the AAA profile, and the virtual AP profile. Other chapters within this
document detail the configuration of the user roles and policies, authentication servers, and server groups.
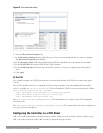
Configuring Captive Portal in the WebUI
To configure captive portal with PEFNG license via the WebUI:
1. Navigate to the Configuration > Security > Authentication > L3 Authentication page.
2. Select Captive Portal Authentication Profile.
a. In the Captive Portal Authentication Profile Instance list, enter the name of the profile (for example, c-
portal), then click Add.
b. Select the captive portal authentication profile you just created.
c. Select the default role (for example, employee) for captive portal users.
d. Enable guest login and/or user login, as well as other parameters (refer to Table 68).
e. Click Apply.
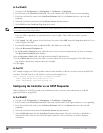
3. To specify the authentication servers, select Server Group under the captive portal authentication profile you just
configured.
a. Select the server group (for example, cp-srv) from the drop-down menu.
b. Click Apply.
4. Select the AAA Profiles tab.
a. In the AAA Profiles Summary, click Add to add a new profile. Enter the name of the profile (for example,
aaa_c-portal), then click Add.
b. Set the Initial role to a role that you will configure with the captive portal authentication profile.
c. Click Apply.
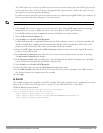
5. Navigate to the Configuration > Security > Access Control page to configure the initial user role to use
captive portal authentication.
a. To edit the predefined logon role, select the System Roles tab, then click Edit for the logon role.
b. To configure a new role, first configure policy rules in the Policies tab, then select the User Roles tab to add a
new user role and assign policies.
c. To specify the captive portal authentication profile, scroll down to the bottom of the page. Select the profile
from the Captive Portal Profile drop-down menu, and click Change.
d. Click Apply.
6. Navigate to the Configuration > Wireless > AP Configuration page to configure the virtual AP profile.
7. Select either the AP Group or AP Specific tab. Click Edit for the applicable AP group name or AP name.
8. Under Profiles, select Wireless LAN, then select Virtual AP.
9. Select NEW from the Add a profile drop-down menu to create a new virtual AP profile. Enter the name for the
virtual AP profile (for example, vp_c-portal), then click Add.
a. In the Profile Details entry for the new virtual AP profile, select the AAA profile you previously configured. A
pop-up window displays the configured AAA profile parameters. Click Apply in the pop-up window.
b. From the SSID profile drop-down menu, select NEW. A pop-up window allows you to configure the SSID
profile.
c. Enter the name for the SSID profile (for example, ssid_c-portal).
d. Enter the Network Name for the SSID (for example, c-portal-ap).
e. Click Apply in the pop-up window.
f. At the bottom of the Profile Details page, click Apply.