


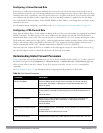
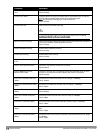

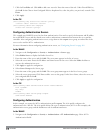
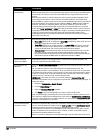

AP Group/Name Virtual AP Profile SSID Profile AAA Profile
“building3-lobby” “guest”
l VLAN: 2
l Deny Time Range
l SSID profile: “guest”
l AAA profile: “default-open”
“guest”
l SSID: Guest
l Open system
“default-open”
(This is a predefined, read-only AAA
profile that specifies open system
authentication)
Configuring the WLAN
In this example WLAN, users are validated against a corporate database on a RADIUS authentication server before
they are allowed access to the network. Once validated, users are placed into a specified VLAN (VLAN 1 in this
example) and assigned the user role “employee” that permits access to the corporate network.
NOTE: Dell recommends that you assign a unique name to each virtual AP, SSID, and AAA profile that you modify. In this example,
you use the name “corpnet” to identify each of the profiles.
Follow the steps below to configure the Corpnet WLAN. Each of these steps are described in further detail later in
this document.
1. Configure a policy for the user role employee and configure the user role employee with the specified policy.
2. Configure RADIUS authentication servers and assign them to the corpnet 802.1x authentication server group.
3. Configure authentication for the WLAN.
a. Create the corpnet 802.1x authentication profile.
b. Create the AAA profile corpnet and specify the previously-configured employee user role for the 802.1x
authentication default role.
c. Specify the previously-configured corpnet 802.1x authentication server group.
4. For the AP group “default”, create and configure the virtual AP corpnet.
a. Create a new virtual AP profile corpnet.
b. Select the previously-configured corpnet AAA profile for this virtual AP.
c. Create a new SSID profile corpnet to configure “Corpnet” for the SSID name and WPA2 for the
authentication.
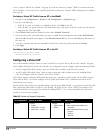
The following sections describe how to do this using the WebUI and the CLI.
Configuring the User Role
In this example, the employee user role allows unrestricted access to network resources and is granted only to users
who have been successfully authenticated with an external RADIUS server. You can configure a more restrictive user
role by specifying allowed or disallowed source and destination, protocol, and service for the traffic. For more
information about configuring user roles, see "Creating User Roles" on page 302.
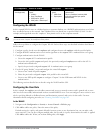
In the WebUI
1. Navigate to the Configuration > Security > Access Control > Policies page.
2. Click Add to add a new policy. Enter the name of the policy.
Default settings for a policy rule permit all traffic from any source to any destination, but you can make a rule
more restrictive. You can also configure multiple rules; the first rule in a policy that matches the traffic is applied.
Click Add to add a rule. When you are done adding rules, click Apply.
DellPowerConnectW-SeriesArubaOS6.2 | User Guide VirtualAPs | 317