


Hardware Installation
2−58 CM 4000 Installation and Operating Manual
PREPARING AND INSTALLING BUTTON LABELS
Control panels are supplied with general purpose labels already installed. A sheet with additional labels is also provided, and
with care, these labels can be substituted for those already installed.
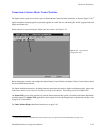
Custom labels. Information and templates for creating custom labels can be found at www.thomsongrassvalley.com in the
Support/FAQ area (search for Answer ID “1425” or Keywords “lens chip”). Copies can then be made on overhead projector
transparency material. Most Jupiter panels use the “Frutiger” typeface.
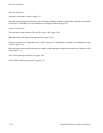
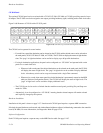
CP 3020/1
MC 3020D/L
VC 3020
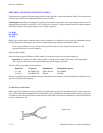
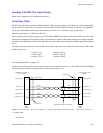
Button caps on these panels are removed using a small screwdriver (or a fingernail). Use the small slot between the clear cap
and the black portion of the button; the slot can be found along the top or bottom of the button housing.
Note: A good technique is to use a corner of the tip of the screwdriver and a fingernail in the same slot. Be
prepared for the cap to come off suddenly!
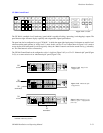
Replacing Button Bulbs
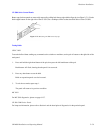
After removing the cap and diffuser, the bulb (which is an incandescent type) can be pulled straight out.
Important: Use extreme care when removing bulbs so that they do not break in the socket. The recommended
tool is a piece of heat shrink or other plastic tubing that will fit snugly on the bulb.
The Grass Valley part numbers for the bulbs are:
Button size GV part no. Manufacturer Manufacturer part no.
0.7−inch 65−028985−005 Oshino Electric OL−685BPE
0.45−inch 65−028985−007 Siemens LY K380
When re−installing the cap, notice that the small slots used during removal must be on the top and bottom of the button or the
cap will not snap into place properly.
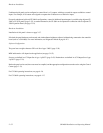
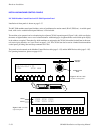
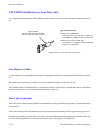
CP 300 Series Control Panels
Button caps for these panels are most easily removed by pulling them straight off with needle nose pliers. Using needle−nose
pliers will insure that only the transparent cap is removed. Do not pry off the entire button top assembly by using a screwdriver
or similar tool; this will not provide access to the label. The existing label is held in place with adhesive; scrape off the label and
replace it with the new one.
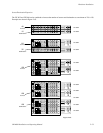
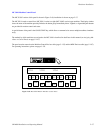
Figure 2−70.