


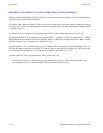
Configurator
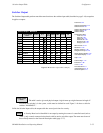
Switcher Output Table
5−57CM 4000 Installation and Operating Manual
5. To close the table, click OK.
6. Click on “File > Save” to save the table.
7. Select the next table for editing. When finished, validate, compile and activate the configuration set. (See page 5−13.)
SETTING PASSWORD LEVELS FOR SWITCHER OUTPUTS
In addition to individual Jupiter passwords assigned to each user, individual switcher outputs can be given a password level.
This can be used to provide varying levels of protection from one switcher output to another.
Note 2: Output passwords are not honored by automation protocol handling.
To change the password level for a switcher output:
1. On the top of the Jupiter Configurator window (page 5−2), check to see whether the configuration set you want to
change is selected for editing.
In most cases, you will want to modify the set that is currently active; if so, you may want to copy the active set and
select the copy for editing. For more information, please see Copying a Configuration Set for Editing on page 5−10.
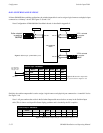
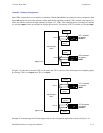
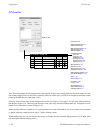
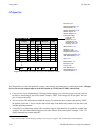
2. Click on “Jupiter > Switcher output.” This will open a list of all existing Switcher Output tables (or open the table if
only one table exists).
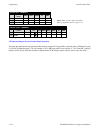
3. Click on the desired Switcher Output table name and “OK.” This will open a table similar to that shown on page 5−55.
In this example, the password level column is blank, meaning that all outputs have a password level of zero. Therefore
all passwords presently assigned will allow changing the signal being sent to any output.
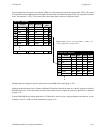
4. Double−click on the password box you want to change.
5. Enter the desired password level for this output.
Entering a level of “50” would mean that only passwords having levels of 50 or more could be used to enable selection
of an input for this output.
Guidelines for using the editor are found on page 5−3.
6. To close the table, click OK.
7. Click on “File > Save” to save the table.
8. After saving your changes, validate, compile, and activate the configuration set.