


Configurator
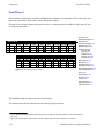
Serial Protocol Table
5−31CM 4000 Installation and Operating Manual
ENTERING PROTOCOL FOR CONTROLLER BOARD PORTS
1. On the top of the Jupiter Configurator window (page 5−2), check to see whether the configuration set you want to
change is selected for editing.
In most cases, you will want to modify the set that is currently active; if so, you may want to copy the active set and
select the copy for editing. For more information, please see Copying a Configuration Set for Editing on page 5−10.
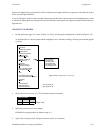
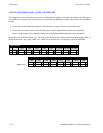
2. Click on “Jupiter > Serial Protocol.” This will open a table similar to that shown on page 5−30. The Board names should
already be present (they were established using the Network Description table—see page 5−27).
3. Double−click on the appropriate protocol box. A pull−down menu will list the possible protocol types. Click on the
desired type. To accept the entry, double−click again.
Guidelines for using the editor are found on page 5−3.
4. Continue the process for the baud rate fields.
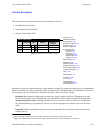
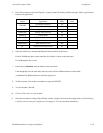
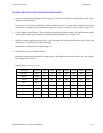
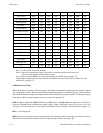
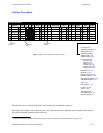
Baud rates will be selected automatically for some protocols. The possible selections are as follows (NA = not available,
Opt = optional, Std = default):
Figure 5−26. Serial protocol selections.
Device type Protocol 1200 2400 4800 9600 19200 38400 115000
GVG200
†
200 NA NA Opt Opt Opt Std NA
Ampex
†
AMP −− −− −− −− −− −− −−
ASCII ASC Opt Opt Opt Std Opt Opt Note 1
DEC
†
DEC −− −− −− −− −− −− −−
DD (Diamond)
†
DIM NA NA Opt Opt Opt Std NA
Datatek DTK NA NA NA NA NA Std NA
Dune
†
DUN −− −− −− −− −− −− −−
ESbus
†
ES −− −− −− −− −− −− −−