


Configurator
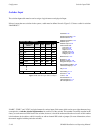
Switcher Input Table
5−51CM 4000 Installation and Operating Manual
ENTERING OR EDITING INPUT NAMES AND NUMBERS
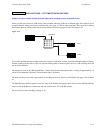
1. On the top of the Jupiter Configurator window (page 5−2), check to see whether the configuration set you want to
change is selected for editing.
In most cases, you will want to modify the set that is currently active; if so, you may want to copy the active set and
select the copy for editing. For more information, please see Copying a Configuration Set for Editing on page 5−10.
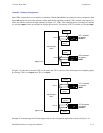
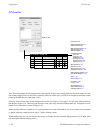
2. Click on “Jupiter” and “Switcher Input.” This will open a list of all existing Switcher Input tables (or open the table if
there is only one).
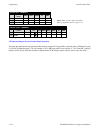
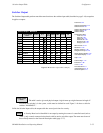
3. Click on the desired switcher input table name and “OK.” This will bring up a table similar to that shown on page 5−48.
If the table is based on the factory−supplied “Numeric” set, the table illustrates the reason for the name “numeric”—the
“Name” column shows all the inputs with numbers instead of names.
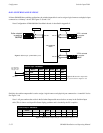
4. Enter/edit the desired logical name and physical input numbers for the inputs.
Guidelines for using the editor are found on page 5−3.
Important: Row numbers on Jupiter tables are used as the “logical” numbers for sources. Changing the row num-
ber of an existing source (by inserting/deleting a new input in the middle of the table, for example) will disrupt
control of the system, requiring controller boards to be memory−cleared and reset (see “Clearing Battery−Pro-
tected Memory” in Appendix B). One way to avoid this interruption is to add new inputs at the end of tables.
5. After saving your changes, validate, compile, and activate the configuration set. (See page 5−13.)