


JNS Remapping
16−2 CM 4000 Installation and Operating Manual
Save Log File − Saves the current log file under the existing name. If the file has not yet been named, the program will default
to the Save As option.
Save Log File As − Saves the current log file under a new name.
Page Setup − Sets up the page layout of the printer.
Print Log File − Prints the current log file.
Exit
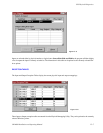
System Definition
This menu allows selection, on a level by level basis, of the range sizes for the level, and the idle physical inputs and outputs
for the level. Range sizes are based on router type and the user is given the opportunity to select numbers from 1 to 64 from
a drop−down list.
View − display the Input or Output Exception tables.
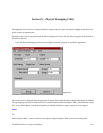
Start Remapping by Entering Physical Numbers
Enter the old physical input or output then a new physical input or output. The old physical number is the original number
from the switcher input or output table. The user should get this old physical number information from the switcher input or
output table, not the Physical Diagnostic utility. However, the user may determine the original physical number by reading
the number from the Physical Diagnostic utility, and looking up the number in the Exception tables. The user may view the
Input or Output Exception table by clicking on the corresponding entry in the View menu (see below).
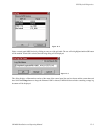
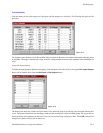
The user may type in physical numbers from the edit box. The Original Physical Input/Output edit box contains all the cur-
rently used physical numbers on the specified switcher and level. The New Physical Input/Output combo box contains all
physical input and output numbers defined as “Idle” in the System Definition Menu for the specified switcher and level.
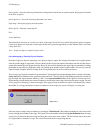
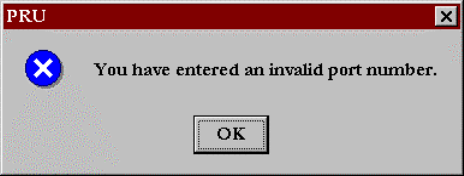
When entering a single number, the screen will update to show him the board range for that specific input or output. The area
will be grayed out, indicating it cannot be changed. After typing in the port number, the system will automatically validate
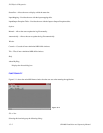
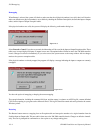
the number. If a wrong port number is entered (a number not in the range), the system will display a warning box:
Figure 16−2.
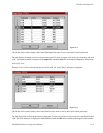
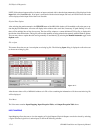
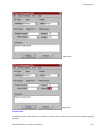
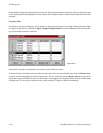
If the user elects to remap a range of numbers by pressing the “Whole Board” radio button, the number he or she enters could
be any of the physical numbers in the range. The system will use the number entered in the System Definition Menu for range
size per level to determine the actual range and insert the correct range in the window. The first window shows the system
if a single number is entered in a range. The second illustration shows a range being entered.