


Control Panel Operation
CP 3832 / 3864
6−113CM 4000 Installation and Operating Manual
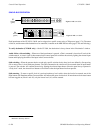
1. Press and release MENU until “DIAGNOSE” appears in the Current window.
2. Use the LEVEL button to select the desired diagnostic.
3. Press TAKE. Instructions for each diagnostic are given below.
To exit the diagnostics mode press CLEAR at any time. (It may be necessary to press CLEAR twice.)
LED Test
This test cycles through the button lamps (LEDs) and illuminates them in green and then red. The test will stop after one cycle.
Pressing CLEAR during this test will cancel this test and return the panel to the beginning of the current diagnostic. Pressing
CLEAR again will exit the Diagnostic mode.
Info
Info displays the panel’s Application (PROM) version , Xilinx FPGA* version, Variant version (not implemented), and PCB
(hardware) version. Press CLEAR to exit.
Baud Rate
When selected, this option displays the current baud rate for the panel. Press LEVEL to cycle through the baud rate settings.
Available baud rates are: 38400, 19200, 9600, 4800, 2400, and 1200. Pressing TAKE will program the changed setting;
CLEAR will cancel.
The baud rate must agree with the setting for the CM 4000 port used by the panel (see Serial Protocol on page 5−30).
Panel ID
This diagnostic requires the panel be disconnected from the MPK data cable.
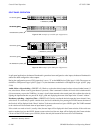
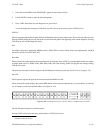
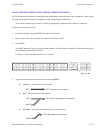
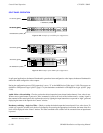
When selected, this option displays the current MPK address for this panel and permits entry of a new address. Use the top
row of buttons to enter a hexadecimal address (see Figure 6−144).
013345678
9A CBDEF
Level Menu Clear
Prot/
Lock
Pre−
set
Take
CURRENT
PRESET
00000032
Figure 6−144. CP 3832 buttons used to enter hex address. CP 3864 buttons are similar.
The CP 3264 panel operates in a similar manner.
Pressing TAKE will program the newly entered address; CLEAR will cancel.
* Defined in Glossary section