


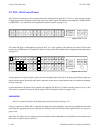

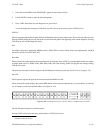
Control Panel Operation
CP 3832 / 3864
6−107CM 4000 Installation and Operating Manual
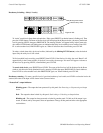
Breakaway switching − multi−level Take − Check to see that the desired output has been selected on the bottom row; if not,
select it now. To switch different sources to different levels with a single Take command, turn PRESET on (the button will
flash red). Then press the LEVEL button. The name of the first level will be displayed in the Preset window. Advance to the
desired level by pressing LEVEL; then select an input for that level; the selection will be shown in the Current window. Press
LEVEL to select another level; select the next input, etc. When all selections have been made, press TAKE.
The input for level 1 will be displayed in the Current window. To check the status of another level, use the LEVEL button
to return to that level; the new input will be displayed in the Current window. (To turn off the LEVEL button, press CLEAR.)
Notice that only the button for the lowest level will illuminate.
Breakaway switching − sticky* level(s) − See page 6−102.
Split statusing − To status a specific level of a previous breakaway level switch, use LEVEL to select the level to be statused;
the name of the input will be shown in the Current window.
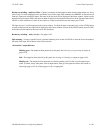
“Protect/lock” output indicator:
Blinking green − The output has been protected* by this panel. See Protecting or Unprotecting an Output on
page 6−103.
Red − The output has been locked* by this panel. See Locking or Unlocking an Output on page 6−104.
Blinking red − The output has been protected or locked by another panel. To find out if the output is pro-
tected, or locked, and by what panel, select an input button. Then go to that panel and refer to the section on
Protecting (page 6−103) or Locking (page 6−104), as appropriate.