


Configurator
5−3CM 4000 Installation and Operating Manual
Configurator Editing Guidelines
AUTOMATIC TABLE ENTRY
This function is designed to expedite the data entry process and eliminate errors due to differences in spelling and entry of
inappropriate data.
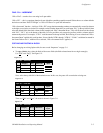
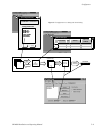
In cases where a controller board or device must be entered on more than one table, Configurator will automatically copy (or
offer as a selectable item) the data entered on the “initial entry” table to all “secondary” tables (including Saturn tables). Enter-
ing information in the same order as the tables appear in the pull−down menu will therefore eliminate most repeat entries. For
example, when a CM 4000 is entered on the Network Description table, the name will be added automatically to the Serial
Protocol table.
Note 1: You cannot enter data on secondary tables first. For example, you must enter a new VM on the Network
Description table. Again, data should be entered in the same order as the tables appear in the pull−down menu.
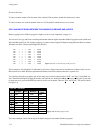
When certain items are deleted, the editor will automatically delete, when appropriate, the corresponding entries on other
tables. For example, when the name of an input is deleted from the Switcher Input table, the input will be deleted automatically
from the other corresponding tables. The same is true for an output deleted from the Switcher Output table. For instance, if the
VTR12 row on the Switcher Input table is deleted, the corresponding row on the CP Input Set table, i.e., the row defining the
category/number keys and mnemonic, will be deleted as well.
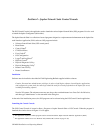
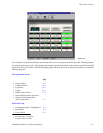
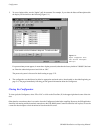
ENTRY/EDIT WITHIN A JUPITER TABLE
• Use the mouse, cursor keys, or TAB to move to the desired field. To accept the change and advance to the next
field, press TAB.
• When a field requires a selection to be made from a fixed list, clicking anywhere in the field will cause a drop−
down arrow to appear. Click on the arrow to show the available choices (or press ALT+DOWN). Click on the
desired choice. (You can also enter the first letter in the list item name; enter the letter again to move to the next
item that starts with that letter, then press RETURN.)
Note 2: In some cases you will need to press “Apply” to update the selections in a drop down list.
• To advance to the next row, press ENTER.
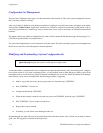
Note 3: New entries should be made at the bottom of tables whenever possible to avoid disrupting system
operation. If entries are made to the middle of tables you must be prepared to clear battery−protected memory
(Pmem) in the VM 3000 and re−establish switcher status and machine links. Clearing Pmem is described in
Appendix B.
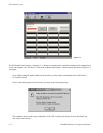
• Press “Apply” to save the changes in memory (they are not saved to disk until you select File > Save). If you
attempt to edit another table before Applying your changes, a pop up message will appear asking you to confirm
or abandon the changes before editing a new table. After Applying all changes, the set can be Saved using the
“File > Save” command. The message “Exporting...” will appear.
• In some cases spaces are not allowed. If so the editor will not allow them to be entered.