


Configuration Swap
H−3CM 4000 Installation and Operating Manual
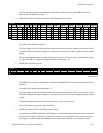
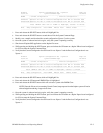
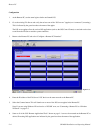
Thomson Jupiter Configuration Set : Xpress−1 Page: 00
03/07/03 System Command Page 19:42:28
−−−−−−−−−−−−−−−−−−−−−−−−−−−−−−−−−−−−−−−−−−−−−−−−−−−−−−−−−−−−−−−−−−−−−−−−−−−−−−−−
BOARD | Current Configuration | Previous Configuration..
−−−−−−−−−−+−−−−−−−−−−−−−−−−−−−−−−−−−−−−−−−−−+−−−−−−−−−−−−−−−−−−−−−−−−−−−−−−−−−−−
CM−Board |Xpress−1−Fri Mar 07 10:28:16 2003|Xpress−2−Fri Mar 07 09:35:16 2003
CM−Board-R|Xpress−1−Fri Mar 07 10:28:16 2003|Xpress−2−Fri Mar 07 09:35:16 2003
−−−−−−−−−−−−−−−−−−−−−−−−−−−−−−−−−−−−−−−−−−−−−−−−−−−−−−−−−−−−−−−−−−−−−−−−−−−−−−−−
Press <SELECT> then <UP> or <DOWN> to Highlight, <Select> to Choose
−−−−−−−−−−−−−−−−−−−−−−−−−−−−−−−−−−−−−−−−−−−−−−−−−−−−−−−−−−−−−−−−−−−−−−−−−−−−−−−−
Exit Swap Configuration Clear PMEM Reboot Local Reboot Global
−−−−−−−−−−−−−−−−−−−−−−−−−−−−−−−−−−−−−−−−−−−−−−−−−−−−−−−−−−−−−−−−−−−−−−−−−−−−−−−−
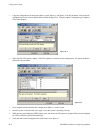
7. Press and release the SELECT button, which will highlight Exit.
8. Press and release the SELECT button a second time to Exit the System Command Page.
9. Modify, save, compile and download the second configuration (Xpress−2) to the system.
10. Once the system is rebooted and active again, verify the system is operating correctly.
11. Shut down all Jupiter/JNS applications on the Jupiter file server.
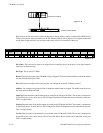
12. While pressing and holding the NEXT button, press and release the UP button on a Jupiter XPress board configured
for VGA to enter the System Command Page.
13. Verify that the Current Configuration for each board is now Xpress−2 and the Previous Configuration is now
Xpress−1.
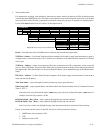
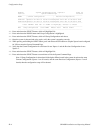
Thomson Jupiter Configuration Set : Xpress−2 Page: 00
03/07/03 System Command Page 20:02:18
−−−−−−−−−−−−−−−−−−−−−−−−−−−−−−−−−−−−−−−−−−−−−−−−−−−−−−−−−−−−−−−−−−−−−−−−−−−−−−−−
BOARD | Current Configuration | Previous Configuration..
−−−−−−−−−−+−−−−−−−−−−−−−−−−−−−−−−−−−−−−−−−−−+−−−−−−−−−−−−−−−−−−−−−−−−−−−−−−−−−−−
CM−Board |Xpress−2−Fri Mar 07 09:35:16 2003|Xpress−1−Fri Mar 07 10:28:16 2003
CM−Board-R|Xpress−2−Fri Mar 07 09:35:16 2003|Xpress−1−Fri Mar 07 10:28:16 2003
−−−−−−−−−−−−−−−−−−−−−−−−−−−−−−−−−−−−−−−−−−−−−−−−−−−−−−−−−−−−−−−−−−−−−−−−−−−−−−−−
Press <SELECT> then <UP> or <DOWN> to Highlight, <Select> to Choose
−−−−−−−−−−−−−−−−−−−−−−−−−−−−−−−−−−−−−−−−−−−−−−−−−−−−−−−−−−−−−−−−−−−−−−−−−−−−−−−−
Exit Swap Configuration Clear PMEM Reboot Local Reboot Global
−−−−−−−−−−−−−−−−−−−−−−−−−−−−−−−−−−−−−−−−−−−−−−−−−−−−−−−−−−−−−−−−−−−−−−−−−−−−−−−−
14. Press and release the SELECT button, which will highlight Exit.
15. Press and release the UP button until PMEM Clear is highlighted.
16. Press and release the SELECT button which will activate a system wide PMEM Clear.
NOTE: Since the file server is not running Control Center, bootp requests from the Jupiter system will not be
acknowledged introducing a longer reboot time.
17. Once the system is rebooted and active again, verify the system is operating correctly.
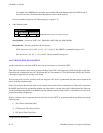
18. While pressing and holding the NEXT button, press and release the UP button on a Jupiter Xpress board configured
for VGA to enter the System Command Page.
19. Verify that the Current Configuration for each board is now Xpress−2 and the Previous Configuration is now
Xpress−1.