


Software Control Panel Suite
7−17CM 4000 Installation and Operating Manual
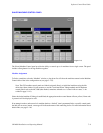
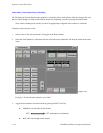
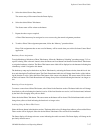
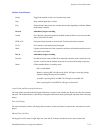
5. Select the desired Source Entry button.
The source entry will be entered into the Preset display.
6. Select the desired Direct Take button.
The Source name will be written to the button.
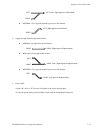
7. Repeat the above steps as required.
A Direct Take button may be reassigned to a new source using the normal assignment procedure.
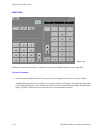
8. To make a Direct Take assignment permanent, follow the “Memory” procedure below.
Direct Take assignments that are not saved in Memory will be erased when you exit the Software Control Panel
application.
Breakaway Preset Assignments
To assign Breakaway Selections to Direct Take buttons, follow the “Breakaway Switching” procedure on page 7−12 ex-
cept for selecting Take at the end. Instead, select the Presets and Load buttons and then the desired Direct Take button
to assign the breakaway selection. The Direct Take button source label will be displayed as red characters indicating that
a breakaway switch is assigned to this button.
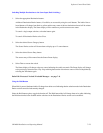
The breakaway setup may be checked on any Direct Take button by activating the Presets window, then the Levels win-
dow, and selecting the Check Preset button. The Check Preset button label color will change from black to yellow indicat-
ing the function is active. Select the Direct Take button of the source to be checked. The source names will be shown
on the Level buttons. The Check Preset button will change from yellow to black indicating the function is no longer ac-
tive.
Removing a Preset Assignment
To remove a source from a Direct Take button, select Unload in the Functions section. The button label color will change
from black to yellow indicating the function is active. If the Load function was active, it will be deactivated, indicated
by the label color changing from yellow to black.
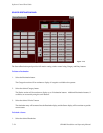
Select the desired Direct Take button. The source name on this button will be cleared. The Unload button label color will
change from yellow to black indicating the function is no longer active.
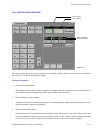
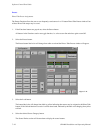
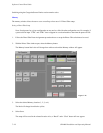
Switching Using the Direct−Take Presets
Select the Presets button in the functions section. The button label color will change from white to yellow and the Direct
Takes section will be displayed. Select the desired Direct Take button. The switch will be immediate.
The Status display will change to the new source indicating the switch was made. The Preset display will change to the
previously selected source.