


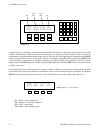

CP 3000 Basic Operation
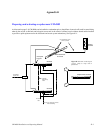
J−5CM 4000 Installation and Operating Manual
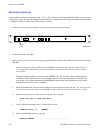
LOCK
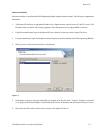
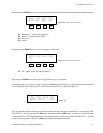
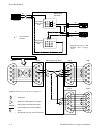
Now that we have routed something to a machine, we don’t want someone from another panel changing or accessing into
that machine. So how do we take care of this problem? From the home menu, if you press the LOCK button you will see the
display shown in Figure J−8; by pressing the TAKE button, you will have locked out that destination so that no other source
can be switched into it from anyone else’s panel—or even your panel. You will notice that a flashing L will appear at the very
left hand top corner of the display.
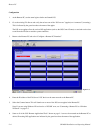
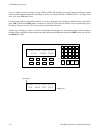
If you wish to unlock it, you must go to the panel that locked it, call up the destination that is locked, and then press the LOCK
and then the TAKE button from the home menu. To find out which panel has something locked, press the LOCK and then
the TAKE button. For a moment, the panel will display in the bottom row which panel has it locked out. For example, it will
read LOCKED BY MON1. This is telling you that the monitor 1 panel has locked out this destination. Remember that any
panel can lock out any destination. By locking out a destination, it must be unlocked before switching even from its own panel.
PROTECT
If you wish to switch from your own panel but protect the output from other panels, then you can use the PROT button. The
protect function is toggled on and off exactly like the lock function using the PROT button.
[Grass Valley would like to thank Mr. Howard Lukk for help in preparing this tutorial.]