


COPYRIGHT
©
1999 CANON INC. CANON imageRUNNER 600 REV.1 JAN. 2000 PRINTED IN U.S.A.
viii
4. Transfer charging Assembly
Cleaning Mechanism ...... 6-30
5. Others............................. 6-31
F. Controlling Separation Charging
............................................ 6-32
1. Outline ............................6-32
2. Correcting the Output to Suit
the Environment and the
Toner Deposit ................. 6-33
3. Correcting the Output upon
Detection of Leakage ..... 6-34
4. Others............................. 6-35
IV . DEVELOPING ASSEMBLY ...... 6-36
A. Outline ................................. 6-36
B. Controlling the Developing
Assembly ............................. 6-37
C. Controlling the Toner Cartridge
Drive Mechanism .................6-38
D. Controlling the Developing Bias
............................................ 6-39
E. Detecting the Toner Level and
Controlling the Toner Supply
Mechanism .......................... 6-41
V . DRUM CLEANER UNIT ........... 6-45
A. Outline ................................. 6-45
B. Detecting the Waste Toner (case
full condition) ....................... 6-46
VI. CONTROLLING THE DRUM
HEATER ................................... 6-48
A. Outline ................................. 6-48
VII .DISASSEMBLY/ASSEMBLY .... 6-49
A. Photosensitive Drum Unit .... 6-50
1. Points to Note When Handling
the Photosensitive Drum 6-50
2. Removing the Photosensitive
Drum............................... 6-51
3. Replacing the Photosensitive
Drum Heater ................... 6-53
4. Mounting the Photosensitive
Drum Unit ....................... 6-54
B. Parts Associated with the
Process Unit ........................ 6-55
1. Removing the Pre-Exposure
Lamp Unit .......................6-55
2. Removing the Potential
Sensor Unit..................... 6-56
3. Removing the Primary
Charging Assembly ........ 6-57
4. Removing the Pre-Transfer
Charging Assembly ........ 6-57
5. Removing the Dust-Collecting
Roller ..............................6-58
6. Removing the Transfer/
Separation Charging
Assembly ........................ 6-58
C. Charging Wire ..................... 6-60
1. Outline ............................6-60
2. Removing the Wire Cleaner of
the Primary Charging
Assembly ........................ 6-60
3. Removing the Wire Cleaner of
the Transfer Separation
Charging Assembly ........ 6-61
4. Routing the Charging Wire
....................................... 6-62
5. Routing the Grid Wire for the
Primary Charging Assembly
....................................... 6-64
6. Adjusting the Height of the
Charging Wire ................ 6-65
D. Process Unit ........................ 6-66
1. Removing the Process Unit
....................................... 6-66
2. Mounting the Process Unit
....................................... 6-68
E. Developing Assembly .......... 6-69
1. Removing the Developing
Assembly ........................ 6-69
2. Removing the Hopper .... 6-70
3. Removing the Blade Unit
....................................... 6-71
4. Mounting the Blade ........ 6-72
5. Removing the Developing
Cylinder ..........................6-72
F. Drum Cleaner Unit............... 6-75
1. Removing the Cleaning Blade
....................................... 6-75
2. Mounting the Cleaning Blade
....................................... 6-77
G. Separation Claw/Separation Claw
Drive Assembly ................... 6-79
CHAPTER 7 PICK-UP/FEEDING SYSTEM
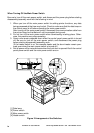
I. OUTLINE .................................... 7-1
A. Specifications and Construction
.............................................. 7-1
B. Arrangement of Rollers and
Sensors ................................. 7-2
II. PICKUP ASSEMBLY .................. 7-3