


High-performance Embedded Workshop 8. Using the Custom Version Control System
REJ10J1837-0100 Rev.1.00 Nov. 16, 2008
142
8.6 Specifying file locations
When referring to a file’s location, be sure to use a placeholder, otherwise the command will only relate to a hardwired
file. For example, let’s imagine that a version control executable has been selected which uses a –GET command to
obtain a read-only copy of a file. The Arguments field could be specified as:
-GET ‘c:\vc\files\project\main.c’
However, when executed, this command can only ever -GET the file MAIN.C. To resolve this problem, High-
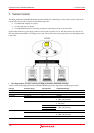
performance Embedded Workshop uses a system of placeholders and directory mappings. Directory mappings tell the
High-performance Embedded Workshop which ‘working’ directories (i.e. where source files are being worked on) map
to which ‘controlled’ directories (i.e. where the source files are stored in the version control system). Mappings between
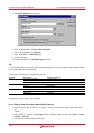
these two directory systems can be specified via the Projects tab of the Version Control Setup dialog box.
Once the mappings have been defined, you can use the Version control directory placeholder, $(VCDIR), to represent
the directory in which the project file is stored.
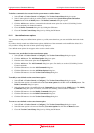
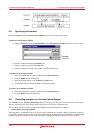
To define a new directory mapping
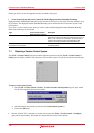
1. Select [Tools -> Version Control -> Configure]. The Version Control Setup dialog box opens.
2. Select the Projects tab.
3. Click the Add button, which is next to the Version Control Directory Mappings list. The Version Control
Directory Mapping dialog box opens.
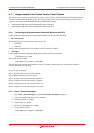
4. Specify a High-performance Embedded Workshop workspace directory or project directory in the Source
directory field. Select one of the following operations:
• Enter the directory name, OR
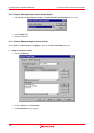
• Click the placeholder button. Then select "Project directory" or "Workspace directory" from the menu, OR
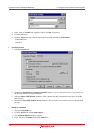
• Click the Browse button to open the Browse to Source Directory dialog box. Select the directory and click
the Select button.
5. Enter the version control directory into the Version Control Directory field.
6. Click the OK button.