


High-performance Embedded Workshop 2. Build Basics
REJ10J1837-0100 Rev.1.00 Nov. 16, 2008
39
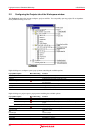
2.3.1 Adding files to a project
Before
building an application, select files to configure the application.
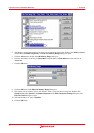
To add files to a project
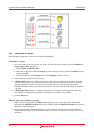
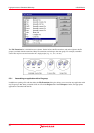
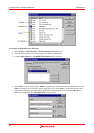
1. Files can be added to the active project only. Select one of the following operations to open the Add files to
project 'project name' dialog box:
• Select [Project -> Add Files], OR
• Right-click on the project within the Projects tab of the workspace window and select Add Files from the
pop-up menu, OR
• Press the "Insert" key when the Projects tab of the Workspace window is selected.
2. Select the file(s) you wish to add to the project.
3. A Relative Path checkbox is available at the bottom of this dialog box. Selecting this checkbox allows the
files to be relative project files. These project files are relative to the workspace file and can also be placed
outside the workspace structure. Even if you re-allocate the entire source tree, the High-performance
Embedded Workshop is able to check the relative position of the files to find them. By default, this checkbox
is selected.
4. A Hide Project Files checkbox is available at the bottom of this dialog box. Selecting this checkbox only
shows the files not added to the current project. By default, this checkbox is not selected.
5. Click the Add button.
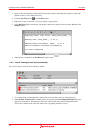
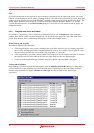
There are other ways to add files to a project
• Right-clicking on an open file in the Editor window displays a pop-up menu. If the file is already in the
project then the Add File To Project menu option is disabled. Select the Add File To Project menu option to
add the file to the current project.
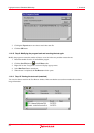
• In the High-performance Embedded Workshop it is also possible to ‘drag and drop’ files from Windows
®
Explorer onto the Projects tab of the workspace window. For details, see section 2.3.2, Drag and drop of files
and folders.