


High-performance Embedded Workshop 2. Build Basics
REJ10J1837-0100 Rev.1.00 Nov. 16, 2008
43
• Select several files as a range
Click a file as the start of the range. Then keep pressing the SHIFT key and click another file as the end of
the selected range.
2. Take either of the two ways listed below. A red cross (
) will appear on the file’s icon, and the file will be
excluded from build.
• Select Exclude Build <file>, where <file> is the name of the selected file, from the pop-up menu opened
by right-clicking. <file> is not displayed if several files are selected.
• Select [Build -> Include/Exclude Build].
2.3.5 Including a project file in build
A fi
le that has been excluded from build can be included again.
To include a project file in build
1. Click on a file that has previously been excluded from build, in the Projects tab of the Workspace window.
It is also possible to select several files by using a mouse or inputs through the keyboard as follows:
• To select several files
Click the files while pressing the CTRL key.
• Select several files as a range
Click a file as the start of the range. Then keep pressing the SHIFT key and click another file as the end of
the selected range.
2. Take either of the two ways listed below. The red cross will be removed from the file’s icon (
), and the file
will be included in build.
• Select Include Build <file>, where <file> is the name of the selected file, from the pop-up menu opened
by clicking the right-mouse button. <file> is not displayed if several files are selected.
• Select [Build -> Include/Exclude Build].
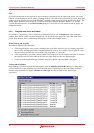
2.4 User folders in the workspace
In the High-performance Embedded Workshop it is possible to add folders to the Projects tab of the workspace window.
This allows you to logically group your files into certain areas within a project. The folder can be set to any name and
this is entered in a dialog box. The operations listed below are not allowed, however, for folders Download modules
and Dependencies that are automatically displayed.
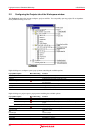
To add a user folder
1. Select the project on the Projects tab of the Workspace window.
2. Right-click and select Add Folder.
3. Enter the name in Folder of the Add Folder dialog box.
4. Click OK.
5. You can now drag and drop files into this folder to group them logically.
To add a sub-folder
1. Select the folder on the Projects tab of the Workspace window.
2. Right-click and select Add Folder.
3. Enter the name in Folder of the Add Folder dialog box