


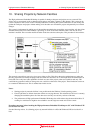


High-performance Embedded Workshop 10. Sharing Projects by Network Facilities
REJ10J1837-0100 Rev.1.00 Nov. 16, 2008
173
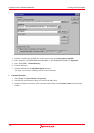
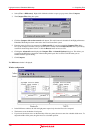
Step2: DCOM
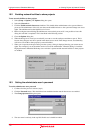
1. Select Run from the Windows® start menu. The Run dialog box is invoked.
2. Enter "dcomcnfg" in the Open field and click the OK button. The Component Services window opens.
3. Expand the tree. If the Window Security Alert dialog box appears at expansion, click the Keep Blocking
button.
Console Root -> Component Services -> Computers -> My Computer
4. Right-click on My Computer and select Properties from the pop-up menu. The My Computer Properties
dialog box is invoked.
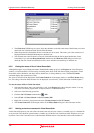
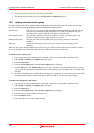
5. Click the COM Security tab.
6. Click the Edit Limits button in the Access Permissions area to open the Access Permission dialog box.
7. Select "ANONYMOUS LOGON" in the Group or user names list.
8. Select the Allow checkbox for Remote Activation in the Permission for ANONYMOUS LOGON list.
9. Click the OK button and close the Access Permission dialog box.
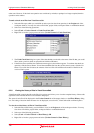
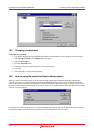
10. Click the Edit Limits button in the Launch and Activation Permission area to open the Launch Permission
dialog box.
11. Select "Everyone" in the Group or user names list.
12. Select the Allow checkbox for Local Launch in the Permission for Everyone list. Select the Allow checkbox
for Remote Activation in the Permission for Everyone list.
13. Click the OK button and close the L
aunch Permission dialog box.
14. Click the OK button on the My Computer Properties dialog box.
15. Close the Component Services window.
• For a client machine with Windows® XP Service Pack 2 or later
Firewall
1. Select Control Panel from the Windows® start menu.
2. Click Network and Internet Connections in the Control Panel.
3. Click Windows Firewall in the Network and Internet Connections. The Windows Firewall dialog box is
invoked.
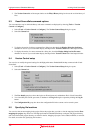
4. Click the Exceptions tab.
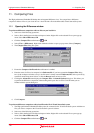
5. Click the Add Program button to open the Add a Program dialog box.
6. Click the Browse button and select HEW2.exe under the High-performance Embedded Workshop installation
directory.
7. Click the OK button and close the Add a Program dialog box.
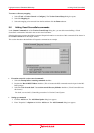
8. Click the Add Port button to open the Add a Port dialog box.
9. Enter "DCOM" in Name and "135" in Port Number and select TCP option button.
10. Click the OK button and close the Add a Port dialog box.
11. Click the OK button in the Windows Firewall di
alog box.
12. Close the Network and Internet Connections.
13. Close the Control Panel.