


High-performance Embedded Workshop 2. Build Basics
REJ10J1837-0100 Rev.1.00 Nov. 16, 2008
41
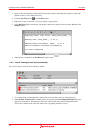
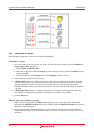
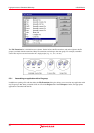
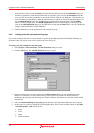
1. In the dialog box, the files are initially sorted by the file type in alphabetical order. If you click a column
header (of file names or types), the files will be sorted by the file name or type.
2. You can select multiple files by clicking. If you then click on one of the checkboxes for the selected files or
press the Space key, checkboxes for all of the selected files will be switched ON or OFF (depending on the
previous state).
3. If the Show files in subfolders checkbox is selected, the dialog box also shows the files within subfolders
under the folder that was dropped. Otherwise the dialog box only shows the files within the folder that was
dropped. By default, this checkbox is selected.
4. If the Show source files only checkbox is selected, the dialog box only shows the files having the extension
specified for the source files in this project (e.g. C source files). Otherwise the dialog box shows all files. If the
High-performance Embedded Workshop cannot recognize the file type, “Unknown type” will be shown in the
File Type column. By default, this checkbox is selected.
5. If the Create folder structure in project checkbox is selected, files are added to the tree where the folder was
dropped. For example, when a folder “data” containing some files is dropped onto the tree, the files are added
into a user folder “data”, which is newly created.
If the Create folder structure in project checkbox is not selected, when you drop a folder onto a user folder,
files in the folder are added into this user folder. When a folder is dropped onto the active project tree, files in
the folder are added into the group folder of the file type (e.g. a file “main.c” is added into the group folder “C
source file”). If a suitable group folder does not exist, the High-performance Embedded Workshop creates it.
Files of an unknown type dropped onto the project are directly added to the project.
By default, this checkbox is not selected.
6. Clicking the Uncheck All button deselects all checkboxes, while clicking the Check All button selects all
checkboxes.
7. Clicking the OK button adds all selected files, which have tick marks in their checkboxes, to the project. Next
time this dialog box is opened, it shows the most recently used setting.
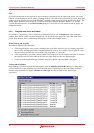
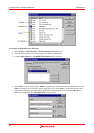
2.3.3 Removing files from a project
There are
three ways of removing files from a project
• Files can be individually removed from a project,
• A selection of files can be removed,
• All files can be removed.
To remove a file(s) from a project
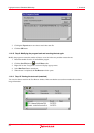
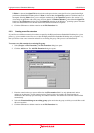
1. Select one of the following operations to open the Remove Project Files dialog will be displayed:
• Select [Project -> Remove Files], OR
• Right-click on the project within the Projects tab of the workspace window and select Remove Files from the
pop-up menu.
2. Select the file(s) that you want to remove from the Project files list.
3. Click the Remove button to remove the file(s), or click the Remove All button to remove all files from the list.
4. Click the OK button to remove the files from the project.