DEFINITY Enterprise Communications Server Release 5
Maintenance and Test for R5vs/si
555-230-123
Issue 1
April 1997
Reliability Systems: A Maintenance Aid
Page 6-22Repair Procedures for High and Critical Reliability
6
When all Standby SPE circuit packs have been upgraded, force the Active SPE
to become the Standby SPE as follows:
1. Issue the status system command from the terminal. Look at the SPE and
MODE fields in the upper left corner of the form to determine the status of
the Standby SPE. Recall that the Standby SPE is labeled as either
“standby,” “maint,” or “down.”
2. If the Standby SPE is labeled as “maint,” continue issuing the refresh
spe-standby command followed by the status system command until the
Standby SPE is labeled “standby.”
NOTE:
It may be necessary to issue the refresh spe-standby command
multiple times to preempt all Standby SPE maintenance activity. If
the refresh spe-standby command successfully completes five
times without the Standby SPE becoming labeled “standby” on the
status system form, wait 20 minutes. Issue the refresh spe-standby
command once more.
3. If the Standby SPE is labeled “standby,” issue the reset system
interchange command from the G3MT. After the SPE-interchange is
complete, log into the terminal, issue the status system command, and
verify that the SPEs have reversed roles.
4. Then, follow the “Circuit Pack Replacement Procedure” for each circuit
pack to be upgraded in the new Standby SPE.
Circuit Pack Replacement Procedure
This procedure does not apply to the TN768 Tone-Clock circuit pack. Please
refer to “TONE-BD”, “TONE-PT”, or “TDM-CLK” in Chapter 10, ‘‘
Maintenance
Object Repair Procedures’’ for the procedure to replace the Tone-Clock circuit
pack.
NOTE:
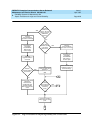
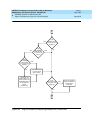
See the flowchart of the procedure for installing or replacing Standby SPE
Circuit Packs In Duplication Option Systems at the end of this section, for
use as a circuit pack replacement maintenance aid.
The following procedure involves throwing the SPE Select Switches to
hard-select the current Active SPE. After completing the circuit pack
replacement procedure, verify that the SPE Select Switches have been returned
to the AUTO position both by noting their position and by noting that the SPE
Select Switch LEDs on the TN772 Duplication Interface circuit packs are not on.
1. Throw the SPE Select Switches, one at a time, to force selection of the
current Active SPE. If SPE B is currently the Active SPE, throw both SPE
Select Switches, one at a time, to the right. If SPE A is currently the Active
SPE, throw both SPE Select Switches, one at a time, to the left. Throwing
the SPE Select Switches automatically disables shadowing.


